
Appearance
深入了解SpringBoot(3.x)启动流程
1.SpringApplication类的初始化
这些是SpringApplication类的所有属性,大家可以先简单的了解一下
java
// 定义了 banner.txt。在 Spring Boot 应用启动时,如果存在该文件,内容会在控制台输出。
public static final String BANNER_LOCATION_PROPERTY_VALUE = "banner.txt";

// 指定了配置属性键,用于设置自定义横幅文件的位置。
public static final String BANNER_LOCATION_PROPERTY = "spring.banner.location";

// 用于指示 Java AWT(抽象窗口工具包)是否在无头模式下运行
private static final String SYSTEM_PROPERTY_JAVA_AWT_HEADLESS = "java.awt.headless";

// 为 SpringApplication 类创建一个日志记录器,用于记录应用程序的运行信息和调试信息
private static final Log logger = LogFactory.getLog(SpringApplication.class);

// 定义了一个关闭钩子,用于在 JVM 关闭时执行特定的清理操作,确保应用程序优雅地停止。
static final SpringApplicationShutdownHook shutdownHook = new SpringApplicationShutdownHook();

// 使用 ThreadLocal 存储 SpringApplicationHook 实例,
// 确保每个线程都有独立的 SpringApplicationHook,避免线程间数据共享导致的并发问题。
private static final ThreadLocal<SpringApplicationHook> applicationHook = new ThreadLocal();

// 存储应用程序的主要源类,这些类通常被用作 Spring 应用程序上下文的主要配置类。
private final Set<Class<?>> primarySources;

// 引用应用程序的主类,即包含 main 方法的类,用于启动 Spring 应用。
private Class<?> mainApplicationClass;

// 指示是否将命令行参数添加到 Spring 环境的属性中,默认情况下为 true
private boolean addCommandLineProperties;

// 指示是否添加默认的类型转换服务,用于在属性绑定等场景中进行类型转换。
private boolean addConversionService;

// 用于设置自定义的横幅,在应用启动时显示。
private Banner banner;

// 用于加载外部资源,如类路径资源、文件系统资源等。
private ResourceLoader resourceLoader;

// 用于生成 Spring Bean 的名称,特别是在组件扫描时使用。
private BeanNameGenerator beanNameGenerator;

// 表示应用程序运行时的环境信息,包括属性、配置文件等。
private ConfigurableEnvironment environment;

// 指示应用程序是否在无头模式下运行。无头模式下,应用程序不依赖显示设备。
private boolean headless;

// 存储应用程序上下文初始化器的列表,
// 这些初始化器在 ApplicationContext 刷新之前被调用,用于对上下文进行自定义初始化。
private List<ApplicationContextInitializer<?>> initializers;

// 存储应用程序事件监听器的列表,这些监听器用于监听并处理应用程序事件。
private List<ApplicationListener<?>> listeners;

// 存储应用程序的默认属性,这些属性在未被其他配置覆盖时生效。
private Map<String, Object> defaultProperties;

// 存储引导注册表初始化器的列表,这些初始化器用于在应用程序引导阶段对注册表进行初始化。
private final List<BootstrapRegistryInitializer> bootstrapRegistryInitializers;

// 存储应用程序的附加配置文件,这些配置文件可用于在不同环境中使用不同的配置。
private Set<String> additionalProfiles;

// 指示是否使用了自定义的环境配置。
private boolean isCustomEnvironment;

// 用于指定环境属性的前缀,方便在环境中查找特定的属性。
private String environmentPrefix;

// 用于创建应用程序上下文的工厂,允许自定义 ApplicationContext 的创建过程。
private ApplicationContextFactory applicationContextFactory;

// 用于收集应用程序启动过程中的指标和统计信息,帮助分析启动性能。
private ApplicationStartup applicationStartup;

// 存储应用程序的配置属性,通常从配置文件或环境变量中加载。
final ApplicationProperties properties;
接下来我们来看看SpringApplication的构造函数
java
public SpringApplication(ResourceLoader resourceLoader, Class<?>... primarySources) {
    this.addCommandLineProperties = true;
    this.addConversionService = true;
    this.headless = true;
    this.additionalProfiles = Collections.emptySet();
    this.isCustomEnvironment = false;
    this.applicationContextFactory = ApplicationContextFactory.DEFAULT;
    this.applicationStartup = ApplicationStartup.DEFAULT;
    this.properties = new ApplicationProperties();
    this.resourceLoader = resourceLoader;
    Assert.notNull(primarySources, "PrimarySources must not be null");
    this.primarySources = new LinkedHashSet(Arrays.asList(primarySources));
    this.properties.setWebApplicationType(WebApplicationType.deduceFromClasspath());
    this.bootstrapRegistryInitializers = new ArrayList(this.getSpringFactoriesInstances(BootstrapRegistryInitializer.class));
    this.setInitializers(this.getSpringFactoriesInstances(ApplicationContextInitializer.class));
    this.setListeners(this.getSpringFactoriesInstances(ApplicationListener.class));
    this.mainApplicationClass = this.deduceMainApplicationClass();
}
我们来一条一条的解析,看看在构造函数中,都完成了哪些操作
1. addCommandLineProperties
java
// 指示是否将命令行参数添加到 Spring 环境的属性中,默认情况下为 true
private boolean addCommandLineProperties;

this.addCommandLineProperties = true;
当 addCommandLineProperties = true 时,这意味着我们可以通过命令行参数来覆盖应用程序中的配置属性。例如,我们在 application.properties 文件中定义了一个属性:
properties
server.port=8080如果你希望在启动应用程序时修改该端口号,可以通过命令行参数来实现:
bash
java -jar your-application.jar --server.port=9090只要命令行中有参数被配置,那么后续项目中的配置文件就不再生效,但如果命令行中没有配置的参数,依旧生效
2. addConversionService
java
// 指示是否添加默认的类型转换服务,用于在属性绑定等场景中进行类型转换。
private boolean addConversionService;

this.addConversionService = true;
this.addConversionService = true 时,Spring Boot 会提供一个默认的 ConversionService,使开发者能够方便地进行类型转换操作。例如,在处理 Web 请求时,将请求参数自动转换为控制器方法的参数类型。
示例:
假设我们有一个控制器方法,需要将请求参数 userId 转换成 Long 类型参数:
java
@RestController
public class UserController {
    @GetMapping("/users/{userId}")
    public ResponseEntity<User> getUser(@PathVariable Long userId) {
        // 处理请求
    }
}
在上述示例中,Spring Boot 会自动将 URL 路径中的 {userId} 参数转换为 Long 类型的 userId 方法参数。
this.addConversionService = false 时,我们也可以通过自定类型转换服务,来实现类型转换。但在本篇就不赘述了。只看一下如何关闭
java
@SpringBootApplication
public class MyApplication {
    public static void main(String[] args) {
        SpringApplication app = new SpringApplication(MyApplication.class);
        app.setAddConversionService(false); // 禁用自动配置的 ConversionService
        app.run(args);
    }
}
3. headless
java
// 指示应用程序是否在无头模式下运行。无头模式下,应用程序不依赖显示设备。
private boolean headless;

this.headless = true;
headless 模式指的是在没有显示设备、键盘或鼠标的环境下运行应用程序的模式。
使用场景:
- 服务器环境: 在没有图形用户界面的服务器上运行 Java 应用程序时,通常会启用 headless 模式,以节省系统资源并避免图形相关的错误。
- 自动化测试: 在进行自动化测试,特别是涉及图形界面组件的测试时,启用 headless 模式可以提高测试效率,并避免因缺少图形环境而导致的异常。
禁用:
应用程序启动类中设置
javapublic static void main(String[] args) { SpringApplication app = new SpringApplication(MyApplication.class); app.setHeadless(false); // 设置为非headless模式 app.run(args); }通过命令行参数设置
bashjava -Djava.awt.headless=false -jar myapp.jar
4. additionalProfiles
java
// 存储应用程序的附加配置文件,这些配置文件可用于在不同环境中使用不同的配置。
private Set<String> additionalProfiles;

this.additionalProfiles = Collections.emptySet();
使用场景示例:
假设您有一个应用程序,需要在开发环境和生产环境中使用不同的数据库配置。您可以按照以下步骤进行配置:
创建配置文件:
application-dev.properties:用于开发环境的数据库配置。application-prod.properties:用于生产环境的数据库配置。
在
application-dev.properties中添加开发环境的数据库配置:propertiesspring.datasource.url=jdbc:mysql://localhost:3306/dev_db spring.datasource.username=dev_user spring.datasource.password=dev_password在
application-prod.properties中添加生产环境的数据库配置:propertiesspring.datasource.url=jdbc:mysql://prod-db-server:3306/prod_db spring.datasource.username=prod_user spring.datasource.password=prod_password在应用程序启动类中设置
additionalProfiles:javapublic static void main(String[] args) { SpringApplication app = new SpringApplication(MyApplication.class); app.setAdditionalProfiles("prod"); // 添加生产环境配置文件 app.run(args); }
5. isCustomEnvironment
java
// 指示是否使用了自定义的环境配置。
private boolean isCustomEnvironment;

this.isCustomEnvironment = false;
使用场景示例:
假设您正在开发一个需要根据不同的运行环境(如开发、测试、生产)加载不同配置的应用程序。为了实现这一点,您可能需要自定义环境配置,以精确控制属性源的加载顺序和内容。在这种情况下,您可以设置 isCustomEnvironment 为 true,并提供自定义的环境配置类。
步骤:
创建自定义环境配置类:
javaimport org.springframework.context.annotation.Bean; import org.springframework.context.annotation.Configuration; import org.springframework.core.env.ConfigurableEnvironment; import org.springframework.core.env.PropertySource; @Configuration public class CustomEnvironmentConfig { @Bean public PropertySource<?> customPropertySource() { // 创建并返回自定义的 PropertySource return new CustomPropertySource("customProperties"); } @Bean public ConfigurableEnvironment environment() { // 创建并配置 ConfigurableEnvironment StandardEnvironment environment = new StandardEnvironment(); environment.getPropertySources().addFirst(customPropertySource()); return environment; } }在应用程序启动类中启用自定义环境配置:
javaimport org.springframework.boot.SpringApplication; import org.springframework.boot.autoconfigure.SpringBootApplication; @SpringBootApplication public class MyApplication { public static void main(String[] args) { SpringApplication app = new SpringApplication(MyApplication.class); app.setEnvironment(new CustomEnvironmentConfig().environment()); app.setCustomEnvironment(true); // 启用自定义环境配置 app.run(args); } }
6. applicationContextFactory
java
// 用于创建应用程序上下文的工厂,允许自定义 ApplicationContext 的创建过程。
private ApplicationContextFactory applicationContextFactory;

this.applicationContextFactory = ApplicationContextFactory.DEFAULT;
使用场景:
如果您需要自定义应用程序上下文的创建过程,例如加载特定的配置文件、设置特定的环境属性,或者在上下文初始化时执行特定的操作,您可以通过设置 applicationContextFactory 来实现。这对于需要精细控制应用程序上下文行为的场景非常有用。
示例:
假设您希望在应用程序启动时加载特定的配置文件,并在上下文初始化时执行特定的操作。您可以按照以下步骤进行配置:
创建自定义的
ApplicationContextFactory实现:javaimport org.springframework.boot.context.ApplicationContextFactory; import org.springframework.context.ApplicationContext; import org.springframework.context.annotation.AnnotationConfigApplicationContext; public class CustomApplicationContextFactory implements ApplicationContextFactory { @Override public ApplicationContext createApplicationContext() { AnnotationConfigApplicationContext context = new AnnotationConfigApplicationContext(); // 设置特定的配置类 context.register(CustomConfig.class); // 执行特定的操作 context.addApplicationListener(new CustomApplicationListener()); return context; } }在应用程序启动类中设置
applicationContextFactory:javaimport org.springframework.boot.SpringApplication; import org.springframework.boot.autoconfigure.SpringBootApplication; @SpringBootApplication public class MyApplication { public static void main(String[] args) { SpringApplication app = new SpringApplication(MyApplication.class); // 设置自定义的 ApplicationContextFactory app.setApplicationContextFactory(new CustomApplicationContextFactory()); app.run(args); } }
7. applicationStartup
java
// 用于收集应用程序启动过程中的指标和统计信息,帮助分析启动性能。
private ApplicationStartup applicationStartup;

this.applicationStartup = ApplicationStartup.DEFAULT;
使用场景:
当您需要监控和分析应用程序启动性能,特别是在大型应用或微服务架构中,收集启动过程的度量数据可以帮助识别瓶颈和优化启动时间。
示例:
假设您希望在应用程序启动时收集性能指标,并将其输出到日志中。您可以按照以下步骤进行配置:
创建自定义的
ApplicationStartup实现:javaimport org.springframework.boot.context.metrics.ApplicationStartup; import org.springframework.boot.context.metrics.buffering.BufferingApplicationStartup; import org.springframework.context.ApplicationContext; import org.springframework.context.annotation.AnnotationConfigApplicationContext; public class CustomApplicationStartup implements ApplicationStartup { private final ApplicationStartup delegate; public CustomApplicationStartup(int bufferSize) { this.delegate = new BufferingApplicationStartup(bufferSize); } @Override public void start() { delegate.start(); } @Override public void stop() { delegate.stop(); // 在此处添加自定义的度量数据处理逻辑,例如输出到日志 } @Override public void recordApplicationStartup(long timeTaken) { delegate.recordApplicationStartup(timeTaken); // 在此处添加自定义的度量数据处理逻辑,例如输出到日志 } }在应用程序启动类中设置
applicationStartup:javaimport org.springframework.boot.SpringApplication; import org.springframework.boot.autoconfigure.SpringBootApplication; import org.springframework.boot.context.metrics.ApplicationStartup; @SpringBootApplication public class MyApplication { public static void main(String[] args) { SpringApplication app = new SpringApplication(MyApplication.class); // 设置自定义的 ApplicationStartup app.setApplicationStartup(new CustomApplicationStartup(10000)); app.run(args); } }
8. properties(初始化)
java
// 存储应用程序的配置属性,通常从配置文件或环境变量中加载。
final ApplicationProperties properties;

this.properties = new ApplicationProperties();
实例化 ApplicationProperties,以便在应用程序中使用。在本步中,只是实例化,并未做任何其它设置。
使用场景:
- 配置管理:
- 将应用程序的各种配置参数(如数据库连接信息、服务器端口、日志级别等)集中管理,便于维护和修改。
- 环境适配:
- 根据不同的运行环境(开发、测试、生产)加载不同的配置文件,实现环境之间的配置切换。
- 类型安全的配置访问:
- 通过将配置属性映射到 Java 类的字段,提供类型安全的访问方式,减少硬编码字符串带来的错误。
假设我们有一个配置文件 application.properties,内容如下:
properties
app.name=MySpringApp
app.version=1.0.0
server.port=8081
我们可以创建一个 ApplicationProperties 类,将这些配置属性映射为字段:
java
import org.springframework.boot.context.properties.ConfigurationProperties;
import org.springframework.stereotype.Component;

@Component
@ConfigurationProperties(prefix = "app")
public class ApplicationProperties {

    private String name;
    private String version;

    // Getter 和 Setter 方法
}
在应用程序中,我们可以通过注入 ApplicationProperties 来访问这些配置:
java
import org.springframework.beans.factory.annotation.Autowired;
import org.springframework.stereotype.Service;

@Service
public class AppService {

    private final ApplicationProperties properties;

    @Autowired
    public AppService(ApplicationProperties properties) {
        this.properties = properties;
    }

    public void printAppInfo() {
        System.out.println("Application Name: " + properties.getName());
        System.out.println("Application Version: " + properties.getVersion());
    }
}
9. resourceLoader
java
// 用于加载外部资源,如类路径资源、文件系统资源等。
private ResourceLoader resourceLoader;

// 这里的resourceLoader是由构造函数传来的
// public SpringApplication(ResourceLoader resourceLoader, Class<?>... primarySources)
this.resourceLoader = resourceLoader;
使用场景:
- 加载类路径资源:
- 使用
ResourceLoader加载位于类路径下的资源文件,例如配置文件、模板文件等。
- 使用
- 加载文件系统资源:
- 使用
ResourceLoader加载位于文件系统中的资源文件,例如日志文件、数据文件等。
- 使用
- 访问外部 URL 资源:
- 使用
ResourceLoader加载通过 URL 访问的资源,例如网络上的图片、文档等。
- 使用
示例:
假设您有一个位于类路径下的文本文件 data.txt,内容如下:
tex
Hello, Spring!您希望在 Spring Bean 中读取该文件的内容。可以按照以下步骤进行:
创建 Bean 并实现
ResourceLoaderAware接口:javaimport org.springframework.context.ResourceLoaderAware; import org.springframework.core.io.Resource; import org.springframework.core.io.ResourceLoader; import java.io.BufferedReader; import java.io.InputStreamReader; import java.io.IOException; @Component public class ResourceReaderBean implements ResourceLoaderAware { private ResourceLoader resourceLoader; @Override public void setResourceLoader(ResourceLoader resourceLoader) { this.resourceLoader = resourceLoader; } public void readResource() { Resource resource = resourceLoader.getResource("classpath:data.txt"); try (BufferedReader reader = new BufferedReader(new InputStreamReader(resource.getInputStream()))) { String line; while ((line = reader.readLine()) != null) { System.out.println(line); } } catch (IOException e) { e.printStackTrace(); } } }在应用程序中使用 Bean:
javaimport org.springframework.boot.SpringApplication; import org.springframework.boot.autoconfigure.SpringBootApplication; import org.springframework.context.ApplicationContext; import org.springframework.beans.factory.annotation.Autowired; @SpringBootApplication public class Application { @Autowired private ResourceReaderBean resourceReaderBean; public static void main(String[] args) { ApplicationContext context = SpringApplication.run(Application.class, args); Application app = context.getBean(Application.class); app.run(); } public void run() { resourceReaderBean.readResource(); } }
10. primarySources
java
// 存储应用程序的主要源类,这些类通常被用作 Spring 应用程序上下文的主要配置类。
private final Set<Class<?>> primarySources;

// primarySources也是由构造函数传来的
// public SpringApplication(ResourceLoader resourceLoader, Class<?>... primarySources)
Assert.notNull(primarySources, "PrimarySources must not be null");
this.primarySources = new LinkedHashSet(Arrays.asList(primarySources));
使用场景分析:
在 Spring Boot 中,primarySources 通常用于指定应用程序的主要配置类。这些配置类可能包含应用程序的核心设置,如组件扫描路径、数据库配置等。通过将这些配置类传递给 SpringApplication,Spring Boot 能够根据提供的源类来初始化应用程序上下文,加载相应的配置和组件。
示例:
假设我们有一个 Spring Boot 应用程序,需要指定多个配置类作为主要源:
java
@Configuration
@ComponentScan(basePackages = "com.example.app")
public class AppConfig {
    // 应用程序的核心配置
}

@Configuration
@EnableAutoConfiguration
public class AutoConfig {
    // 自动配置类
}
在创建 SpringApplication 实例时,可以将这些配置类作为 primarySources 参数传入:
java
public class Application {
    public static void main(String[] args) {
        SpringApplication app = new SpringApplication(AppConfig.class, AutoConfig.class);
        app.run(args);
    }
}
11. properties(设置WebApplicationType)
java
// 存储应用程序的配置属性,通常从配置文件或环境变量中加载。
final ApplicationProperties properties;
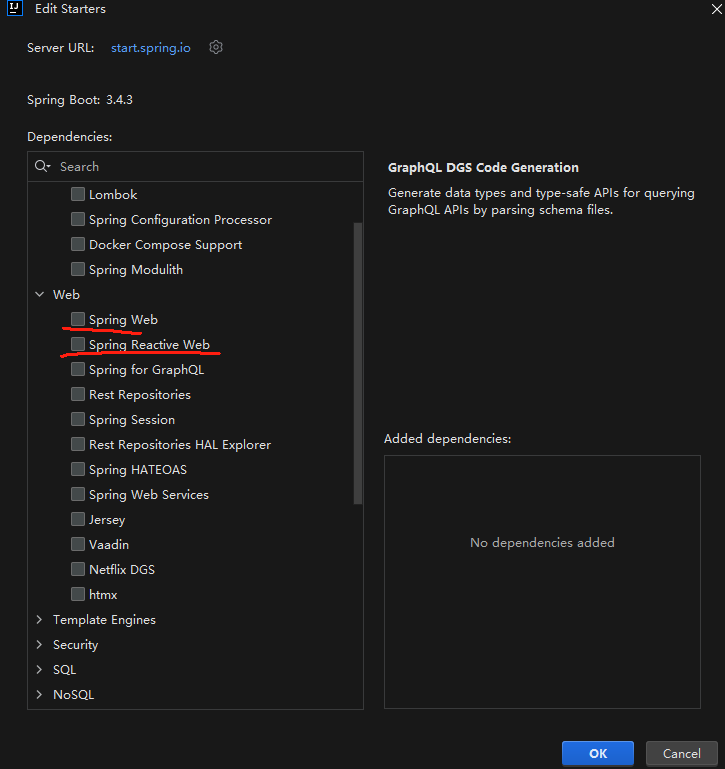
this.properties.setWebApplicationType(WebApplicationType.deduceFromClasspath());假设您的应用程序需要根据类路径中的依赖来决定是否作为 Web 应用程序运行:
- 无 Web 依赖: 如果类路径中没有 Web 相关依赖,应用程序将被识别为非 Web 应用程序,不启动 Web 服务器。
- 有 Servlet Web 依赖: 如果类路径中存在
spring-boot-starter-web,应用程序将被识别为 Servlet 基于 Web 应用程序,启动嵌入式 Servlet Web 服务器。 - 有 Reactive Web 依赖: 如果类路径中存在
spring-boot-starter-webflux,应用程序将被识别为响应式 Web 应用程序,启动嵌入式响应式 Web 服务器。
如果你在创建项目的时配置,什么都没选,那么就会返回None,如果有选对应的类别,就会被扫描识别出来
12. bootstrapRegistryInitializers
java
// 存储引导注册表初始化器的列表,这些初始化器用于在应用程序引导阶段对注册表进行初始化。
private final List<BootstrapRegistryInitializer> bootstrapRegistryInitializers;

this.bootstrapRegistryInitializers = new ArrayList(this.getSpringFactoriesInstances(BootstrapRegistryInitializer.class));
要在 Spring Boot 3 中使用 BootstrapRegistryInitializer,您可以按照以下步骤进行:
创建一个实现
BootstrapRegistryInitializer接口的类:该类需要实现initialize方法,在其中执行所需的注册逻辑。javapackage com.example.demo; import org.springframework.boot.BootstrapRegistry; import org.springframework.boot.BootstrapRegistryInitializer; import org.springframework.stereotype.Component; @Component public class MyBootstrapRegistryInitializer implements BootstrapRegistryInitializer { @Override public void initialize(BootstrapRegistry registry) { // 在此处执行注册逻辑 System.out.println("Initializing Bootstrap Registry"); // 例如,注册一个自定义的服务实例 registry.register(MyService.class, context -> new MyService()); } }确保该类被 Spring 扫描到:在 Spring Boot 3 中,您可以使用
@Component注解将该类标记为组件,以便 Spring 自动检测和注册它。在应用程序中使用注册的服务:在应用程序的其他部分,您可以通过依赖注入的方式使用在引导阶段注册的服务。
javapackage com.example.demo; import org.springframework.stereotype.Service; @Service public class MyService { public void performAction() { System.out.println("Performing action in MyService"); } }javapackage com.example.demo; import org.springframework.beans.factory.annotation.Autowired; import org.springframework.boot.CommandLineRunner; import org.springframework.stereotype.Component; @Component public class MyAppRunner implements CommandLineRunner { private final MyService myService; @Autowired public MyAppRunner(MyService myService) { this.myService = myService; } @Override public void run(String... args) { myService.performAction(); } }
13. setInitializers()
java
// 存储应用程序上下文初始化器的列表,
// 这些初始化器在 ApplicationContext 刷新之前被调用,用于对上下文进行自定义初始化。
private List<ApplicationContextInitializer<?>> initializers;

this.setInitializers(this.getSpringFactoriesInstances(ApplicationContextInitializer.class));
创建 ApplicationContextInitializer 实现类:
java
import org.springframework.context.ApplicationContextInitializer;
import org.springframework.context.ConfigurableApplicationContext;

public class CustomApplicationContextInitializer implements ApplicationContextInitializer<ConfigurableApplicationContext> {
    @Override
    public void initialize(ConfigurableApplicationContext applicationContext) {
        // 在此处添加自定义初始化逻辑
        System.out.println("Initializing ApplicationContext...");
        // 例如,设置活动的配置文件
        applicationContext.getEnvironment().setActiveProfiles("dev");
    }
}在应用程序主类中添加初始化器:
在您的 Spring Boot 应用程序主类中,使用 SpringApplication.addInitializers 方法添加自定义的初始化器:
java
import org.springframework.boot.SpringApplication;
import org.springframework.boot.autoconfigure.SpringBootApplication;
import org.springframework.context.ApplicationContextInitializer;
import org.springframework.context.ConfigurableApplicationContext;

@SpringBootApplication
public class MyApplication {
    public static void main(String[] args) {
        SpringApplication application = new SpringApplication(MyApplication.class);
        // 添加自定义的 ApplicationContextInitializer
        application.addInitializers(new CustomApplicationContextInitializer());
        ConfigurableApplicationContext context = application.run(args);
        // 应用启动后,可以在此处执行其他操作
        context.close();
    }
}
14. setListeners()
java
// 存储应用程序事件监听器的列表,这些监听器用于监听并处理应用程序事件。
private List<ApplicationListener<?>> listeners;

this.setListeners(this.getSpringFactoriesInstances(ApplicationListener.class));
将监听器声明为 Spring Bean:
实现 ApplicationListener 接口的类上添加 @Component 注解,或者在配置类中使用 @Bean 注解注册。
使用 @Component 注解:
java
import org.springframework.context.ApplicationListener;
import org.springframework.context.event.ContextRefreshedEvent;
import org.springframework.stereotype.Component;

@Component
public class MyApplicationListener implements ApplicationListener<ContextRefreshedEvent> {
    @Override
    public void onApplicationEvent(ContextRefreshedEvent event) {
        // 处理事件的逻辑
    }
}
使用 @Bean 注解:
java
import org.springframework.context.ApplicationListener;
import org.springframework.context.event.ContextRefreshedEvent;
import org.springframework.context.annotation.Bean;
import org.springframework.context.annotation.Configuration;

@Configuration
public class ListenerConfig {
    @Bean
    public ApplicationListener<ContextRefreshedEvent> myApplicationListener() {
        return event -> {
            // 处理事件的逻辑
        };
    }
}
通过 SpringApplication 的 addListeners 方法添加:
在应用程序的启动类中,通过 SpringApplication 实例的 addListeners 方法手动添加监听器。
java
import org.springframework.boot.SpringApplication;
import org.springframework.boot.autoconfigure.SpringBootApplication;
import org.springframework.context.ApplicationListener;
import org.springframework.context.event.ApplicationReadyEvent;

@SpringBootApplication
public class MyApplication {
    public static void main(String[] args) {
        SpringApplication app = new SpringApplication(MyApplication.class);
        app.addListeners((ApplicationListener<ApplicationReadyEvent>) event -> {
            // 处理事件的逻辑
        });
        app.run(args);
    }
}
使用 @EventListener 注解:
在 Spring 4.2 及以上版本中,可以在方法上使用 @EventListener 注解,声明该方法为事件监听器。
java
import org.springframework.context.event.EventListener;
import org.springframework.stereotype.Component;

@Component
public class MyEventListener {
    @EventListener
    public void handleContextRefresh(ContextRefreshedEvent event) {
        // 处理事件的逻辑
    }
}
15. mainApplicationClass
java
// 引用应用程序的主类,即包含 main 方法的类,用于启动 Spring 应用。
private Class<?> mainApplicationClass;

this.mainApplicationClass = this.deduceMainApplicationClass();
mainApplicationClass 字段:
- 用于存储应用程序主类的
Class对象。 - 该类通常包含
public static void main(String[] args)方法,是应用启动的入口。
deduceMainApplicationClass() 方法:
- 该方法利用 Java 9 引入的
StackWalkerAPI 遍历调用堆栈,查找名为main的方法。 - 一旦找到,返回该方法所属的类,即主应用类。
- 如果未找到,则返回
null。
2.SpringApplication.run()(纵向)
在学习Spring Boot的过程中,大家一定对主函数(main方法)非常熟悉,每次启动应用程序时,都会调用这个主函数,进而启动Spring Boot。
在Spring Boot应用程序中,启动过程通常从包含@SpringBootApplication注解的主类的main方法开始。在main方法中,调用了SpringApplication.run()方法,这个方法负责启动整个Spring应用程序。
java
@SpringBootApplication
public class DemoApplication {

    public static void main(String[] args) {
        SpringApplication.run(DemoApplication.class, args);
    }
}@SpringBootApplication是一个组合注解,包括@Configuration、@EnableAutoConfiguration和@ComponentScan。其中,@EnableAutoConfiguration注解会在类路径的META-INF/spring.factories文件中找到所有的自动配置类,并将这些类加载到Spring容器中。
当我们点击一次run方法,进入后可以看到,该方法接受一个主配置类(primarySource)和可变长度的字符串参数(args),用于传递命令行参数。它实际上是对第二个run方法的重载,内部调用了第二个方法,将单个主配置类包装成数组后传递。
主配置类的定义:主配置类通常位于项目的根包或根包的子包中,使用
@SpringBootApplication注解标识。
java
// 方法1 单主类
public static ConfigurableApplicationContext run(Class<?> primarySource, String... args) {
	return run(new Class[]{primarySource}, args);
}当我们再次点击后会定位到下述方法中,该方法接受一个主配置类数组(primarySources)和一个字符串数组(args),用于传递命令行参数。它首先创建一个SpringApplication实例,传入主配置类数组,然后调用该实例的run方法,启动应用程序。
java
// 方法2 多主类
public static ConfigurableApplicationContext run(Class<?>[] primarySources, String[] args) {
	return (new SpringApplication(primarySources)).run(args);
}
两个方法的关系
- 方法重载:
- 两个
run方法是重载关系,根据参数类型(单主类 vs. 多主类)区分。 - 单主类方法是对多主类方法的封装,目的是简化常见场景的调用。
- 两个
- 实际工作委托:
- 单主类方法通过
new Class[]{primarySource}将参数转换为数组后,调用多主类方法。 - 最终统一通过
SpringApplication实例的run()完成启动。
- 单主类方法通过
当我们再次点击一次run方法,就会定位到真正实现的地方。
java
// 1.方法定义
// 作用: 启动Spring应用,并返回配置好的应用上下文
// 参数: args 是命令行参数,用于配置应用(如--server.port=8080)
public ConfigurableApplicationContext run(String... args) {
    // 2.启动计时与关闭钩子
    // Startup: 用于记录应用启动时间,跟踪各阶段耗时
    Startup startup = SpringApplication.Startup.create();

    // Shutdown Hook: 如果配置启用(registerShutdownHook),
    // 注册JVM关闭钩子,确保应用能优雅关闭(如释放资源、关闭上下文)
    // this.properties请看下面的补充内容
    // 该字段的定义:final ApplicationProperties properties;
    if (this.properties.isRegisterShutdownHook()) {
        shutdownHook.enableShutdownHookAddition();
    }

    // 3.创建引导上下文
    // BootstrapContext:引导阶段的上下文,
    // 用于在Spring上下文完全初始化之前加载一些早期组件
    //(如BootstrapRegistry中的基础设施Bean)。
    DefaultBootstrapContext bootstrapContext = this.createBootstrapContext();

    // 先声明并初始化,然后再 main方法中通过SpringApplication.run()调用
    // 并将返回的ApplicationContext实例赋值给context变量
    ConfigurableApplicationContext context = null;

    // 4.配置Headless
    // Headless模式:设置系统属性java.awt.headless=true,
    // 确保应用在没有图形界面环境中正常运行(如服务器环境)
    this.configureHeadlessProperty();

    // 5.初始化事件监听器
    // SpringApplicationRunListeners:获取所有SpringApplicationRunListener的实现
    //(如EventPublishingRunListener),用于发布应用启动事件。
	// starting():触发ApplicationStartingEvent事件,标志应用启动开始。
    SpringApplicationRunListeners listeners = this.getRunListeners(args);
    listeners.starting(bootstrapContext, this.mainApplicationClass);

    Throwable ex;
    try {
        // 6.准备环境与配置
        // ApplicationArguments:封装命令行参数,提供便捷的访问接口。
        ApplicationArguments applicationArguments = new DefaultApplicationArguments(args);

        // prepareEnvironment():
        // 加载配置文件(如application.properties)。
        // 激活Profiles(如--spring.profiles.active=dev)。
        // 触发ApplicationEnvironmentPreparedEvent事件,允许外部修改环境配置。
        ConfigurableEnvironment environment = this.prepareEnvironment(listeners, bootstrapContext, applicationArguments);

        // 7.打印Banner
        // Banner:打印启动时的ASCII艺术标志(默认是Spring Boot的LOGO)
        // 可通过banner.txt自定义。(放在resources文件下)
        Banner printedBanner = this.printBanner(environment);

        // 8.创建应用上下文
        // createApplicationContext():根据应用类型(Servlet、Reactive、普通)
        // 创建对应的ApplicationContext
        //(如AnnotationConfigServletWebServerApplicationContext)
        context = this.createApplicationContext();

        // ApplicationStartup:用于跟踪应用启动过程的性能指标(需要配合StartupStep使用)。
        context.setApplicationStartup(this.applicationStartup);

        // 9.准备上下文
        // prepareContext():
        // 将环境配置(Environment)绑定到上下文。
        // 注册BeanDefinitionLoader,加载主配置类(@SpringBootApplication标注的类)。
        // 触发ApplicationContextInitializedEvent事件,允许自定义上下文初始化逻辑。
        this.prepareContext(bootstrapContext, context, environment, listeners, applicationArguments, printedBanner);

       	// 10.刷新上下文
       	// refreshContext():
       	// 调用AbstractApplicationContext.refresh(),这是Spring上下文初始化的核心方法。
        // 加载所有Bean定义(BeanFactory)。
        // 初始化内嵌Web服务器(如Tomcat、Netty)。
        // 触发ApplicationPreparedEvent和ContextRefreshedEvent事件。
        this.refreshContext(context);

        // 11.后置处理
        // afterRefresh():空方法,留给子类扩展。
        // startup.started():标记应用启动完成,记录启动耗时。
        this.afterRefresh(context, applicationArguments);
        startup.started();

        // 12.记录启动日志
        // StartupInfoLogger:输出启动信息,如版本、运行环境、激活的Profile等。
        if (this.properties.isLogStartupInfo()) {
            (new StartupInfoLogger(this.mainApplicationClass, environment)).logStarted(this.getApplicationLog(), startup);
        }

        // 13.触发启动完成事件
        // started():触发ApplicationStartedEvent事件,表示上下文已刷新且Bean已加载。
        // callRunners():执行所有ApplicationRunner和CommandLineRunner的run()方法,
        // 用于启动后执行特定逻辑。
        listeners.started(context, startup.timeTakenToStarted());
        this.callRunners(context, applicationArguments);
    } catch (Throwable var10) {
        ex = var10;
        throw this.handleRunFailure(context, ex, listeners);
    }

    try {
        if (context.isRunning()) {
            // 14.触发应用就绪事件
            // ready():触发ApplicationReadyEvent事件,表示应用已完全启动,可以接收请求。
            listeners.ready(context, startup.ready());
        }

        return context;
    } catch (Throwable var9) {
        ex = var9;
        throw this.handleRunFailure(context, ex, (SpringApplicationRunListeners)null);
    }
}
总结流程
- 初始化阶段:创建上下文、配置环境、注册关闭钩子。
- 事件通知:通过监听器发布各阶段事件(
starting,environmentPrepared,contextInitialized,started,ready)。 - 上下文刷新:加载Bean、启动内嵌服务器。
- 后置处理:执行Runner、记录日志。
- 异常处理:确保任何失败都能优雅关闭。
关键点
- 事件驱动:通过
SpringApplicationRunListener实现扩展点,允许在启动过程插入自定义逻辑。 - 上下文刷新:
refresh()是Spring核心,负责Bean加载、依赖注入、AOP等。 - 内嵌服务器:根据类路径依赖自动选择(如Tomcat、Jetty)。
- Runner接口:
ApplicationRunner和CommandLineRunner用于启动后执行代码。
补充
ApplicationProperties 是 Spring Boot 中用于管理应用启动配置属性的核心类,封装了一系列控制 Spring 应用行为的开关和参数。这些属性可通过编程式 API 或外部配置(如 application.properties)设置,直接影响 Spring Boot 的初始化流程、Bean 管理、日志输出等核心行为。
java
class ApplicationProperties {
    // 是否允许同名 Bean 定义覆盖(解决多模块冲突),默认是false
    private boolean allowBeanDefinitionOverriding;

    // 是否允许循环依赖(构造器注入场景下需谨慎开启)
    private boolean allowCircularReferences;

    // 控制启动 Banner 显示模式(CONSOLE/LOG/OFF)
    // OFF:不显示横幅。
    // CONSOLE:在控制台显示横幅。
    // LOG:将横幅输出到日志文件。
    private Banner.Mode bannerMode;

    // 是否保持主线程存活(防止 Web 服务器自动退出)
    private boolean keepAlive;

    // 是否启用懒加载(减少启动时间,可能影响运行时性能)
    private boolean lazyInitialization = false;

    // 是否在应用程序启动时记录启动信息(如版本、Profile、耗时等)
    private boolean logStartupInfo = true;

    // 是否注册 JVM 关闭钩子(优雅关闭应用)上述的run方法中用到了
    private boolean registerShutdownHook = true;

    // 配置源(如主类、配置文件路径) 通常是配置类或 XML 配置文件的路径。
    private Set<String> sources = new LinkedHashSet();

    // 应用类型(SERVLET/REACTIVE/NONE)
    // NONE:非 Web 应用程序。
    // SERVLET:基于 Servlet 的 Web 应用程序。
    // REACTIVE:响应式 Web 应用程序。
    private WebApplicationType webApplicationType;

    ApplicationProperties() {}

    boolean isAllowBeanDefinitionOverriding() {
        return this.allowBeanDefinitionOverriding;
    }

    void setAllowBeanDefinitionOverriding(boolean allowBeanDefinitionOverriding) {
        this.allowBeanDefinitionOverriding = allowBeanDefinitionOverriding;
    }

    boolean isAllowCircularReferences() {
        return this.allowCircularReferences;
    }

    void setAllowCircularReferences(boolean allowCircularReferences) {
        this.allowCircularReferences = allowCircularReferences;
    }
	// 作用:动态决定 Banner 显示模式。
    // 逻辑:
    // 若显式配置了 bannerMode,直接返回。
    // 否则检查是否启用了结构化日志(如 JSON 格式)。
    // 若启用,自动关闭 Banner 避免破坏日志结构;否则默认显示到控制台。
    Banner.Mode getBannerMode(Environment environment) {
        if (this.bannerMode != null) {
            return this.bannerMode;
        } else {
            boolean structuredLoggingEnabled = environment.containsProperty(LoggingSystemProperty.CONSOLE_STRUCTURED_FORMAT.getApplicationPropertyName());
            return structuredLoggingEnabled ? Mode.OFF : Mode.CONSOLE;
        }
    }

    void setBannerMode(Banner.Mode bannerMode) {
        this.bannerMode = bannerMode;
    }

    boolean isKeepAlive() {
        return this.keepAlive;
    }

    void setKeepAlive(boolean keepAlive) {
        this.keepAlive = keepAlive;
    }

    boolean isLazyInitialization() {
        return this.lazyInitialization;
    }

    void setLazyInitialization(boolean lazyInitialization) {
        this.lazyInitialization = lazyInitialization;
    }

    boolean isLogStartupInfo() {
        return this.logStartupInfo;
    }

    void setLogStartupInfo(boolean logStartupInfo) {
        this.logStartupInfo = logStartupInfo;
    }

    boolean isRegisterShutdownHook() {
        return this.registerShutdownHook;
    }

    void setRegisterShutdownHook(boolean registerShutdownHook) {
        this.registerShutdownHook = registerShutdownHook;
    }

    Set<String> getSources() {
        return this.sources;
    }

    void setSources(Set<String> sources) {
        // 细节:使用 LinkedHashSet 进行防御性拷贝,避免外部修改影响内部状态,同时保留插入顺序。
        this.sources = new LinkedHashSet(sources);
    }

    WebApplicationType getWebApplicationType() {
        return this.webApplicationType;
    }

    void setWebApplicationType(WebApplicationType webApplicationType) {
        this.webApplicationType = webApplicationType;
    }
	// 作用:为 GraalVM 原生镜像编译提供运行时提示,
    // 确保 ApplicationProperties 类在 AOT(Ahead-of-Time)编译时能被正确识别和处理。
    static class ApplicationPropertiesRuntimeHints implements RuntimeHintsRegistrar {
        ApplicationPropertiesRuntimeHints() {
        }
	    // 该方法实现了 RuntimeHintsRegistrar 接口,
        // 用于在运行时向 RuntimeHints 实例注册反射提示信息。
        public void registerHints(RuntimeHints hints, ClassLoader classLoader) {
            BindableRuntimeHintsRegistrar.forTypes(new Class[]{ApplicationProperties.class}).registerHints(hints, classLoader);
        }
    }
}
3.启动计时与关闭钩子
启动计时
java
// 2.启动计时与关闭钩子
// Startup: 用于记录应用启动时间,跟踪各阶段耗时
Startup startup = SpringApplication.Startup.create();

abstract static class Startup {
    // Duration 类的主要特点:
    // 时间单位: Duration 使用基于时间的值(秒和纳秒)来测量时间量。
    // 适用场景: Duration 适用于需要以秒或纳秒为单位测量时间量的场景,
    // 特别是处理较短时间段或需要高精度的情况。
    // 字段作用:记录从应用启动开始到调用 started() 方法的时间差(即应用上下文刷新完成的耗时)。
    // 使用场景:在 started() 方法中计算并存储。
    private Duration timeTakenToStarted;

    Startup() {}

    protected abstract long startTime(); // 获取应用启动的开始时间戳(毫秒)

    protected abstract Long processUptime(); // 获取进程运行时间(可能关联 CRaC 机制)

    protected abstract String action(); // 描述当前启动阶段或操作(如 "start" 或 "restore")

    // 作用:标记应用上下文刷新完成的时间点,返回从启动开始到该阶段的耗时。
    // 调用时机:在 Spring Boot 的 run() 方法中,上下文刷新完成后调用。
    final Duration started() {
        long now = System.currentTimeMillis();
        this.timeTakenToStarted = Duration.ofMillis(now - this.startTime());
        return this.timeTakenToStarted;
    }

    Duration timeTakenToStarted() {
        return this.timeTakenToStarted;
    }

    // 作用:计算从启动开始到当前时间点的总耗时(应用完全就绪的时间)。
    // 调用时机:在 run() 方法的应用就绪事件(ApplicationReadyEvent)中调用。
    private Duration ready() {
        long now = System.currentTimeMillis();
        return Duration.ofMillis(now - this.startTime());
    }

    // 作用:根据是否支持 CRaC 机制,创建对应的 Startup 实现。
    // CRaC 检测逻辑:
    // 检查类路径中是否存在 jdk.crac.management.CRaCMXBean 和
    // org.crac.management.CRaCMXBean。
    // 若存在,使用 CoordinatedRestoreAtCheckpointStartup(优化恢复场景的时间统计)。
    // 否则,使用 StandardStartup(常规启动时间统计)。
    static Startup create() {
        ClassLoader classLoader = Startup.class.getClassLoader();
        return (Startup)(ClassUtils.isPresent("jdk.crac.management.CRaCMXBean", classLoader) && ClassUtils.isPresent("org.crac.management.CRaCMXBean", classLoader) ? new CoordinatedRestoreAtCheckpointStartup() : new StandardStartup());
    }
}
这个时候可能有人要好奇了,这个 this.startTime()是怎么来的。使用IDEA的小伙伴一定可以在对应方法的旁边看到这个抽象方法有两个实现,我们点开可以发现就是 在 create() 方法里出现过的 StandardStartup 和 CoordinatedRestoreAtCheckpointStartup 。我们不妨点击查看一下
java
// StandardStartup
private static final class StandardStartup extends Startup {
    // 获取系统当前时间
    private final Long startTime = System.currentTimeMillis();

    private StandardStartup() {}

    protected long startTime() {
        return this.startTime;
    }

    protected Long processUptime() {
        try {
            // 此方法返回 RuntimeMXBean 接口的实例,该接口提供关于 JVM 运行时的信息。
            // getUptime():此方法返回 JVM 自启动以来的运行时间,单位为毫秒。
            // 在Spring篇中就不过多讨论
            return ManagementFactory.getRuntimeMXBean().getUptime();
        } catch (Throwable var2) {
            return null;
        }
    }

    protected String action() {
        return "Started";
    }
}

// CoordinatedRestoreAtCheckpointStartup
private static final class CoordinatedRestoreAtCheckpointStartup extends Startup {
    private final StandardStartup fallback = new StandardStartup();

    private CoordinatedRestoreAtCheckpointStartup() {
    }

    protected Long processUptime() {
        long uptime = CRaCMXBean.getCRaCMXBean().getUptimeSinceRestore();
        return uptime >= 0L ? uptime : this.fallback.processUptime();
    }

    protected String action() {
        return this.restoreTime() >= 0L ? "Restored" : this.fallback.action();
    }

    private long restoreTime() {
        return CRaCMXBean.getCRaCMXBean().getRestoreTime();
    }

    protected long startTime() {
        long restoreTime = this.restoreTime();
        return restoreTime >= 0L ? restoreTime : this.fallback.startTime();
    }
}
自此,启动计时的功能已经结束。
关闭钩子(可先跳过阅读)
java
// Shutdown Hook: 如果配置启用(registerShutdownHook),
// 注册JVM关闭钩子,确保应用能优雅关闭(如释放资源、关闭上下文)
if (this.properties.isRegisterShutdownHook()) {
    // shutdownHook 是 SpringApplication类中的一个字段
    shutdownHook.enableShutdownHookAddition();
}

// 对应字段
static final SpringApplicationShutdownHook shutdownHook = new SpringApplicationShutdownHook();
SpringApplicationShutdownHook 是 Spring Boot 中用于管理应用关闭逻辑的核心组件,负责在 JVM 关闭时(如 kill 命令或 System.exit())优雅地关闭所有注册的 ApplicationContext 并执行自定义清理任务。它通过注册 JVM 的 Shutdown Hook 实现,确保应用退出前释放资源。
核心设计目标
- 统一关闭入口:集中管理所有需要关闭的上下文和清理任务。
- 线程安全:通过同步机制确保多线程环境下的数据一致性。
- 超时控制:防止关闭过程无限阻塞。
- 可扩展性:允许动态添加/移除自定义关闭任务(
Runnable)。
我们可以进入 SpringApplicationShutdownHook 中看个究竟
java
class SpringApplicationShutdownHook implements Runnable {
    private static final int SLEEP = 50;
    private static final long TIMEOUT;
    private static final Log logger;

    // 存储所有通过 addShutdownHook 注册的 Runnable 任务。
    private final Handlers handlers = new Handlers();

    // 注册的活跃上下文
    // 留个疑问1,为什么此处要使用 LinkedHashSet,而不是用别的容器
    private final Set<ConfigurableApplicationContext> contexts = new LinkedHashSet();
    // 弱引用存储已关闭的上下文(防内存泄漏)
    // 弱引用属于JVM中的知识,大家如果还不知道,可以查看我的JVM篇
    private final Set<ConfigurableApplicationContext> closedContexts = Collections.newSetFromMap(new WeakHashMap());

    private final ApplicationContextClosedListener contextCloseListener = new ApplicationContextClosedListener();

    // 作用:防止重复注册和并发修改问题。
    // 确保 Shutdown Hook 只注册一次
    // AtomicBoolean 是 Java 提供的一个原子变量类,
    // 位于 java.util.concurrent.atomic 包中,专门用于在多线程环境下以原子方式更新布尔值。
    private final AtomicBoolean shutdownHookAdded = new AtomicBoolean();
    // 是否允许注册 Shutdown Hook,只有在此值为 true 时,系统才会尝试添加关闭钩子。
    private volatile boolean shutdownHookAdditionEnabled = false;
    // 标记关闭是否正在进行
    private boolean inProgress;

    SpringApplicationShutdownHook() {}

    SpringApplicationShutdownHandlers getHandlers() {
        return this.handlers;
    }

    void enableShutdownHookAddition() {
        this.shutdownHookAdditionEnabled = true;
    }


    void registerApplicationContext(ConfigurableApplicationContext context) {
        this.addRuntimeShutdownHookIfNecessary(); // 注册 Shutdown Hook
        Class var2 = SpringApplicationShutdownHook.class;
        synchronized(SpringApplicationShutdownHook.class) {
            this.assertNotInProgress(); // 检查是否正在关闭
            context.addApplicationListener(this.contextCloseListener); // 监听上下文关闭事件
            this.contexts.add(context); // 添加到活跃上下文集合
        }
    }

    private void addRuntimeShutdownHookIfNecessary() {
        // 在此,compareAndSet(false, true) 的含义是:
        // 如果 shutdownHookAdded 当前值为 false,则将其更新为 true,
        // 并返回 true;如果当前值不是 false,则返回 false。
        // 该操作确保在多线程环境下,关闭钩子只会被添加一次,避免重复注册。
        if (this.shutdownHookAdditionEnabled && this.shutdownHookAdded.compareAndSet(false, true)) {
            this.addRuntimeShutdownHook();
        }
    }

    void addRuntimeShutdownHook() {
        // Runtime.getRuntime():
        //   获取当前 Java 应用程序的运行时对象,允许与 Java 虚拟机(JVM)交互。
        // addShutdownHook(Thread hook):
        //   1. 注册一个新的虚拟机关闭钩子。
        //   2. 当 JVM 关闭时,所有注册的关闭钩子会被启动,并允许并发执行。
        //   3. 关闭钩子通常用于执行清理操作,如释放资源、保存状态等。
        // new Thread(this, "SpringApplicationShutdownHook"):
        //   1. 创建一个新的线程,其中 this 指向当前对象(SpringApplicationShutdownHook),
        //   线程名称为 "SpringApplicationShutdownHook"。
        //   2. 当 JVM 关闭时,这个线程会被启动,并执行 run 方法中的清理操作。
        Runtime.getRuntime().addShutdownHook(new Thread(this, "SpringApplicationShutdownHook"));
    }

    void deregisterFailedApplicationContext(ConfigurableApplicationContext applicationContext) {
        Class var2 = SpringApplicationShutdownHook.class;
        synchronized(SpringApplicationShutdownHook.class) {
            Assert.state(!applicationContext.isActive(), "Cannot unregister active application context");
            this.contexts.remove(applicationContext);
        }
    }

    public void run() {
        Class var4 = SpringApplicationShutdownHook.class;
        LinkedHashSet contexts;
        LinkedHashSet closedContexts;
        ArrayList handlers;
        // 获取锁并初始化变量
        synchronized(SpringApplicationShutdownHook.class) {
            this.inProgress = true;
            // 复制当前活跃的应用上下文集合。
            contexts = new LinkedHashSet(this.contexts);
            // 复制已关闭的应用上下文集合。
            closedContexts = new LinkedHashSet(this.closedContexts);
            // 获取并复制所有注册的关闭处理器(Handler)集合,
            // 并将其顺序反转,以确保在执行时按照特定顺序处理。
            handlers = new ArrayList(this.handlers.getActions());
            Collections.reverse(handlers);
        }

        contexts.forEach(this::closeAndWait); // 关闭所有活跃上下文
        closedContexts.forEach(this::closeAndWait); // 确保已标记关闭的上下文真正关闭
        handlers.forEach(Handler::run); // 执行自定义关闭任务
    }

    boolean isApplicationContextRegistered(ConfigurableApplicationContext context) {
        Class var2 = SpringApplicationShutdownHook.class;
        synchronized(SpringApplicationShutdownHook.class) {
            return this.contexts.contains(context);
        }
    }

    void reset() {
        Class var1 = SpringApplicationShutdownHook.class;
        synchronized(SpringApplicationShutdownHook.class) {
            this.contexts.clear();
            this.closedContexts.clear();
            this.handlers.getActions().clear();
            this.inProgress = false;
        }
    }

    // 设计:避免因某些资源无法释放导致 JVM 无法退出。
    private void closeAndWait(ConfigurableApplicationContext context) {
        if (context.isActive()) {
            context.close(); // 触发关闭

            try {
                // 等待直到上下文非活跃或超时(10分钟)
                for(int waited = 0; context.isActive(); waited += 50) {
                    if ((long)waited > TIMEOUT) {
                        throw new TimeoutException();
                    }
				  // 每50ms检查一次
                    Thread.sleep(50L);
                }
               // 处理中断或超时异常
            } catch (InterruptedException var3) {
                Thread.currentThread().interrupt();
                logger.warn("Interrupted waiting for application context " + String.valueOf(context) + " to become inactive");
            } catch (TimeoutException var4) {
                TimeoutException ex = var4;
                logger.warn("Timed out waiting for application context " + String.valueOf(context) + " to become inactive", ex);
            }

        }
    }

    // assertNotInProgress 方法的作用是确保在执行某些操作之前,当前没有其他关闭过程正在进行。
    // 若发现关闭过程已在进行中,则抛出异常,防止并发问题。
    private void assertNotInProgress() {
        Assert.state(!this.inProgress, "Shutdown in progress");
    }
    // ------------------------------------------
	// 这是Assert.class里的一段,以供理解上述Assert.state(),并非当前类的内容
    @Contract("false, _ -> fail")
    public static void state(boolean expression, String message) {
        if (!expression) {
            throw new IllegalStateException(message);
        }
    }
    // -----------------------------------------

    static {
        // TIMEOUT 的赋值
        TIMEOUT = TimeUnit.MINUTES.toMillis(10L);
        logger = LogFactory.getLog(SpringApplicationShutdownHook.class);
    }

    // 使用 Handler 包装 Runnable,
    // 通过 System.identityHashCode 确保任务唯一性(防止重复添加同一实例)
    private final class Handlers implements SpringApplicationShutdownHandlers, Runnable {
        private final Set<Handler> actions = new LinkedHashSet(); // 存储所有注册的关闭操作

        private Handlers() {}

        public void add(Runnable action) {
            // 验证传入的 action 不为 null。
            Assert.notNull(action, "Action must not be null");
            // 如果需要,添加 JVM 关闭钩子。
            SpringApplicationShutdownHook.this.addRuntimeShutdownHookIfNecessary();
            Class var2 = SpringApplicationShutdownHook.class;
            // 同步访问 actions 集合,确保线程安全。
            synchronized(SpringApplicationShutdownHook.class) {
                // 调用 assertNotInProgress() 方法,确保当前没有关闭操作正在进行。
                SpringApplicationShutdownHook.this.assertNotInProgress();
                // 将新的 Handler 对象添加到 actions 集合中。
                this.actions.add(new Handler(action)); // 包装为 Handler(基于引用相等性)
            }
        }

        public void remove(Runnable action) {
            Assert.notNull(action, "Action must not be null");
            Class var2 = SpringApplicationShutdownHook.class;
            synchronized(SpringApplicationShutdownHook.class) {
                SpringApplicationShutdownHook.this.assertNotInProgress();
                this.actions.remove(new Handler(action));
            }
        }

        Set<Handler> getActions() {
            return this.actions;
        }

        public void run() {
            // 调用外部类的 run() 方法,执行默认的关闭操作。
            SpringApplicationShutdownHook.this.run();
            // 调用外部类的 reset() 方法,重置关闭钩子的状态。
            SpringApplicationShutdownHook.this.reset();
        }
    }
	// 主要用于监听 Spring 应用上下文关闭事件。
    // 当应用上下文关闭时,该监听器会被触发,执行特定的操作。
    // 自动更新上下文状态,避免重复关闭。
    private final class ApplicationContextClosedListener implements ApplicationListener<ContextClosedEvent> {
        private ApplicationContextClosedListener() {}

        public void onApplicationEvent(ContextClosedEvent event) {
            Class var2 = SpringApplicationShutdownHook.class;
            synchronized(SpringApplicationShutdownHook.class) {
                ApplicationContext applicationContext = event.getApplicationContext();
                SpringApplicationShutdownHook.this.contexts.remove(applicationContext);
                SpringApplicationShutdownHook.this.closedContexts.add((ConfigurableApplicationContext)applicationContext);
            }
        }
    }
	// 用于封装一个可运行的操作(Runnable)
    static record Handler(Runnable runnable) {
        // Handler 是一个记录类(record)
        // Java 会自动生成构造方法、hashCode()、equals() 和 toString() 方法
        // 下列显示定义构造方法也是可以的
        Handler(Runnable runnable) {
            this.runnable = runnable;
        }

	    // 该方法返回 runnable 对象的身份哈希码,即对象在内存中的地址值。
        // 确保保了即使两个 Handler 实例封装的是相同的 Runnable 对象
        public int hashCode() {
            return System.identityHashCode(this.runnable);
        }

        // 只有当两个 Handler 实例封装的是同一个 Runnable 对象时,它们才被视为相等。
        public boolean equals(Object obj) {
            // 检查引用是否相同
            if (this == obj) {
                return true;
            }
            // 检查对象类型是否相同
            else if (obj != null && this.getClass() == obj.getClass()) {
                // 比较封装的 runnable 对象是否相同(使用引用相等性比较)
                return this.runnable == ((Handler)obj).runnable;
            } else {
                return false;
            }
        }

        void run() {
            this.runnable.run();
        }

        public Runnable runnable() {
            return this.runnable;
        }
    }
}
疑问解答
1.为什么使用LinkedHashSet来存储ConfigurableApplicationContext
1. 维护插入顺序
- 核心需求:在应用关闭时,需要按照上下文注册的逆序关闭各个
ApplicationContext。例如,后注册的上下文可能依赖于先注册的上下文,逆序关闭可以避免依赖问题。 - 实现方式:
LinkedHashSet内部通过双向链表维护元素的插入顺序。虽然直接遍历LinkedHashSet是按插入顺序进行的,但代码在关闭时可以通过反转集合(如new ArrayList(contexts).reversed())实现逆序关闭。 - 对比
HashSet:HashSet不保证遍历顺序,可能导致关闭顺序不可预测,引发依赖相关的异常。
2. 避免重复元素
Set的特性:LinkedHashSet继承自HashSet,天然保证元素唯一性,避免同一上下文被重复注册到关闭队列中。
3. 性能权衡
- 时间复杂度:
LinkedHashSet的插入、删除和查找操作时间复杂度为O(1)(与HashSet相同),优于TreeSet的O(log n)。- 遍历效率与
HashSet相当,但能按顺序访问。
- 空间开销:
LinkedHashSet因维护链表指针会有轻微额外内存占用,但在Spring应用关闭场景中,上下文数量通常有限,此开销可忽略。
4. 与业务逻辑的一致性
- 关闭监听器的处理: 在
registerApplicationContext()中,上下文被添加后,会注册一个ApplicationContextClosedListener。当某个上下文提前关闭(如手动调用close()),监听器会将其从contexts移到closedContexts集合。LinkedHashSet的顺序性确保这种状态迁移的准确性。
5. 同步机制的支持
- 线程安全: 虽然
LinkedHashSet本身非线程安全,但所有对contexts的操作(如注册、移除)均在synchronized块内完成,保证了多线程环境下的数据一致性。
4.创建引导上下文
java
// run方法中对应的代码
DefaultBootstrapContext bootstrapContext = this.createBootstrapContext();
ConfigurableApplicationContext context = null;

// 对应的方法
private DefaultBootstrapContext createBootstrapContext() {
    DefaultBootstrapContext bootstrapContext = new DefaultBootstrapContext();
    this.bootstrapRegistryInitializers.forEach((initializer) -> {
        initializer.initialize(bootstrapContext);
    });
    return bootstrapContext;
}
DefaultBootstrapContext 是 Spring Boot 中引导阶段(Bootstrap Phase)的上下文管理器,负责在 Spring 应用启动的早期阶段(主应用上下文 ApplicationContext 初始化之前)注册、创建和管理基础设施组件。它通过延迟初始化、作用域控制和事件通知机制,为 Spring Boot 的启动流程提供灵活的扩展点。
大家可以简单了解一下,废话不多说,直接上源码!
java
public class DefaultBootstrapContext implements ConfigurableBootstrapContext {
    // 存储类型与实例供应商的映射,用于按需创建实例。
    private final Map<Class<?>, BootstrapRegistry.InstanceSupplier<?>> instanceSuppliers = new HashMap();
    // 缓存单例作用域的实例,避免重复创建。
    private final Map<Class<?>, Object> instances = new HashMap();
    // 事件广播器,用于发布 BootstrapContextClosedEvent 事件。
    private final ApplicationEventMulticaster events = new SimpleApplicationEventMulticaster();

    public DefaultBootstrapContext() {}

    // 功能: 将指定类型及其实例供应商注册到引导上下文中。
    // 行为: 调用重载方法 this.register(type, instanceSupplier, true),即允许替换已存在的注册
    public <T> void register(Class<T> type, BootstrapRegistry.InstanceSupplier<T> instanceSupplier) {
        this.register(type, instanceSupplier, true);
    }
	// 功能:仅在引导上下文中尚未注册指定类型时,将其及其实例供应商注册。
    // 行为:调用重载方法 this.register(type, instanceSupplier, false),即不允许替换已存在的注册
    public <T> void registerIfAbsent(Class<T> type, BootstrapRegistry.InstanceSupplier<T> instanceSupplier) {
        this.register(type, instanceSupplier, false);
    }

    // 方法参数:
    // Class<T> type:要注册的实例类型。
    // BootstrapRegistry.InstanceSupplier<T> instanceSupplier:提供实例的供应商。
    // boolean replaceExisting:指示是否允许替换已存在的注册。
    private <T> void register(Class<T> type, BootstrapRegistry.InstanceSupplier<T> instanceSupplier, boolean replaceExisting) {
        // 使用 Assert.notNull 方法检查 type 和 instanceSupplier 参数是否为 null。
        // 如果任一参数为 null,将抛出 IllegalArgumentException,并显示相应的错误消息。
        Assert.notNull(type, "Type must not be null");
        Assert.notNull(instanceSupplier, "InstanceSupplier must not be null");
        synchronized(this.instanceSuppliers) {
            boolean alreadyRegistered = this.instanceSuppliers.containsKey(type);
            // 如果 replaceExisting 为 true,或者指定类型尚未注册,则执行注册操作。
            if (replaceExisting || !alreadyRegistered) {
                // 使用 Assert.state 方法检查 instances Map中是否已包含指定类型的实例。
                // 如果已存在,抛出 IllegalStateException,并显示相应的错误消息。
                Assert.state(!this.instances.containsKey(type), () -> {
                    return type.getName() + " has already been created";
                });
                this.instanceSuppliers.put(type, instanceSupplier);
            }

        }
    }

    public <T> boolean isRegistered(Class<T> type) {
        synchronized(this.instanceSuppliers) {
            return this.instanceSuppliers.containsKey(type);
        }
    }

    public <T> BootstrapRegistry.InstanceSupplier<T> getRegisteredInstanceSupplier(Class<T> type) {
        synchronized(this.instanceSuppliers) {
            return (BootstrapRegistry.InstanceSupplier)this.instanceSuppliers.get(type);
        }
    }

    // addCloseListener 方法用于向应用程序事件多播器(ApplicationEventMulticaster)添加一个关闭监听器
    public void addCloseListener(ApplicationListener<BootstrapContextClosedEvent> listener) {
        this.events.addApplicationListener(listener);
    }

    // 如果实例未注册,则抛出 IllegalStateException。
    // 通过调用 getOrElseThrow 方法实现,传递了一个提供异常的 Supplier。
    public <T> T get(Class<T> type) throws IllegalStateException {
        return this.getOrElseThrow(type, () -> {
            return new IllegalStateException(type.getName() + " has not been registered");
        });
    }
	// 如果实例未注册,则返回提供的默认值。
    // 它通过调用 getOrElseSupply 方法实现,传递了一个返回默认值的 Supplier。
    public <T> T getOrElse(Class<T> type, T other) {
        return this.getOrElseSupply(type, () -> {
            return other;
        });
    }

    // 如果实例未注册,则调用提供的 Supplier 获取默认值。
    // 它首先在同步块中检查实例是否已注册,如果已注册,则返回实例;
    // 否则,调用 Supplier 获取默认值。
    public <T> T getOrElseSupply(Class<T> type, Supplier<T> other) {
        synchronized(this.instanceSuppliers) {
            BootstrapRegistry.InstanceSupplier<?> instanceSupplier = (BootstrapRegistry.InstanceSupplier)this.instanceSuppliers.get(type);
            return instanceSupplier != null ? this.getInstance(type, instanceSupplier) : other.get();
        }
    }
	// 用于从上下文中获取指定类型的实例。
    // 如果该类型的实例尚未注册,则抛出由 exceptionSupplier 提供的异常。
    public <T, X extends Throwable> T getOrElseThrow(Class<T> type, Supplier<? extends X> exceptionSupplier) throws X {
        synchronized(this.instanceSuppliers) {
            BootstrapRegistry.InstanceSupplier<?> instanceSupplier = (BootstrapRegistry.InstanceSupplier)this.instanceSuppliers.get(type);
            if (instanceSupplier == null) {
                throw (Throwable)exceptionSupplier.get();
            } else {
                return this.getInstance(type, instanceSupplier);
            }
        }
    }

    private <T> T getInstance(Class<T> type, BootstrapRegistry.InstanceSupplier<?> instanceSupplier) {
        // 尝试从 instances 缓存中获取指定类型的实例。
        T instance = this.instances.get(type);
        if (instance == null) {
            // 如果缓存中不存在该类型的实例,则通过提供的 instanceSupplier 创建一个新实例。
            instance = instanceSupplier.get(this);
            // 果 instanceSupplier 的作用域是单例(Scope.SINGLETON),
            // 则将新创建的实例放入 instances 缓存中,以便下次直接使用。
            if (instanceSupplier.getScope() == Scope.SINGLETON) {
                this.instances.put(type, instance);
            }
        }

        return instance;
    }

    // close 方法用于关闭引导上下文,并发布一个 BootstrapContextClosedEvent 事件。
    public void close(ConfigurableApplicationContext applicationContext) {
        this.events.multicastEvent(new BootstrapContextClosedEvent(this, applicationContext));
    }
}
6.配置Headless
java
this.configureHeadlessProperty();
private void configureHeadlessProperty() {
    // java.awt.headless 是一个系统属性,用于指示当前环境是否支持图形设备(如显示器、键盘和鼠标)
    // System.getProperty("java.awt.headless") 获取当前系统属性 java.awt.headless 的值;
    // 如果该属性尚未设置,则使用 Boolean.toString(this.headless) 的值。
    // 然后,System.setProperty 方法将该值应用于 java.awt.headless 属性。
    System.setProperty("java.awt.headless", System.getProperty("java.awt.headless", Boolean.toString(this.headless)));
}
7.初始化事件监听器
java
SpringApplicationRunListeners listeners = this.getRunListeners(args);
// 获取并组装应用运行监听器集合的核心方法
private SpringApplicationRunListeners getRunListeners(String[] args) {
    // 通过 ArgumentResolver.of(SpringApplication.class, this) 创建一个 argumentResolver 实例,
    // 该实例用于解析与 SpringApplication 相关的参数。
    SpringFactoriesLoader.ArgumentResolver argumentResolver = ArgumentResolver.of(SpringApplication.class, this);
    argumentResolver = argumentResolver.and(String[].class, args);
    // 通过 SpringFactoriesLoader 加载 META-INF/spring.factories 中注册的所有 SpringApplicationRunListener 实现。
    List<SpringApplicationRunListener> listeners = this.getSpringFactoriesInstances(SpringApplicationRunListener.class, argumentResolver);
    SpringApplicationHook hook = (SpringApplicationHook)applicationHook.get();
    SpringApplicationRunListener hookListener = hook != null ? hook.getRunListener(this) : null;
    if (hookListener != null) {
        listeners = new ArrayList((Collection)listeners);
        ((List)listeners).add(hookListener);
    }

    return new SpringApplicationRunListeners(logger, (List)listeners, this.applicationStartup);
}
java
listeners.starting(bootstrapContext, this.mainApplicationClass);
// SpringApplicationRunListeners.class
void starting(ConfigurableBootstrapContext bootstrapContext, Class<?> mainApplicationClass) {
    this.doWithListeners("spring.boot.application.starting", (listener) -> {
        listener.starting(bootstrapContext);
    }, (step) -> {
        if (mainApplicationClass != null) {
            step.tag("mainApplicationClass", mainApplicationClass.getName());
        }

    });
}